Saturday, February 28, 2009
Our visit to Leu Gardens
Last Sunday, we were given, by Andrew's parents, free tickets to the Orlando Opera, where we enjoyed La Cerenentola (Cinderella). The opera started at 2:00, so we visited Leu Gardens before the show.
Leu Gardens is a 49-acre public botanical garden, with an old Florida home that was formerly inhabited by the Leu family, as well as some of the previous property owners. The gardens are lovely, especially the camellias right now.
The Gardens have over 2,000 varieties of camellias. We photographed just a few:
After browsing through the beautiful camellias and the rose garden (which is mostly dormant at this time of year), we visited the Leu House and Museum.
The downstairs has oak flooring, but the upstairs has the original heart pine floors!
The kitchen, although modernized a bit through the years, has been decorated to reflect its history. A local woman donated the old gas/coal burning range
and they have added this old gas-powered refrigerator, too.
Unfortunately, the modern 3-compartment sink looks out of place. To bad it hasn't been changed to a more period-appropriate one. It just doesn't look right to me.
But, I do like the scalloped wood trim (not very visible in this photo, but it is there), above the window.
The house originally had no indoor plumbing, but it was added in the 1940s, and there are 2 truly vintage bathrooms that have been preserved as-is, with fabulous original fixtures and tile!
The Yellow and Green Bathroom:
The deep green and yellow tile is just gorgeous. The fixtures all all original, too. Notice the details of the toilet, pedestal sink, and the gently curved tub.
The trim around the tile edge is really cheerful. It's wonderful that none of this was ever "updated."
The Black and White Bathroom:
The classic white 4x4s with the trim inset is just beautiful. I like the single row of black along the floor, to draw the eye downward. It's such a simple design, which is why it still looks so fresh.
Love the square tub, and the classic spiral pattern floor tile. I have never seen a bi-color square accent tile like this one before...wow!
Check out the shower, which is also original to the house, circa 1940s!!
The black and white trim inset adds a lot of style to this otherwise plain bathroom.
As do the sturdy sink, and octagon-and-dot floor tile.
Last weekend at Andrew's
A great deal of sweeping, dusting, vacuuming, and mopping has gone on since Thursday, and the house is looking good! The linens were all laundered and hung out on the clothesline in the sunny breeze all day. The drapes are all at the dry cleaner's being cleaned and pressed, too.
Because I know that I have a tendency to pass over the tedious items on the to-do list, and I'm afraid they may never get finished, I am determined to complete a few things before we move back in. So, this weekend, Andrew finished sanding and clear-coating the baseboards.
We should be able to install the baseboards tomorrow.
Meanwhile, I filled in the dozens and dozens of nail holes in the ceiling trim molding in both rooms.
(It may seem like a small thing, but the difference between seeing shiny nail heads way up there, and then not seeing them, is HUGE)! I discovered about 2 dozen more holes that I had not previously noticed, a single row, all the way across the kitchen, once I was up on the ladder. I honestly felt a little sick when I saw that neat little row of holes, spaced 2-4 inches apart. My fingers ache from rolling, mixing, and pressing in little balls of waxy wood filler, and I now have some weird ladder-induced foot pain syndrome. But, every nail hole is filled, with 2 coats of clear poly over them, too.
We took a break this afternoon for lunch and a trip to the dump (here's Andrew looking forward to going to the dump),
We cleared out everything but the old dishwasher, which we'll donate to Habitat, if we can't sell it on Craigslist.
We also moved the dining table back into the kitchen. It's so nice to have it back! And it will be nice to finally be back home again.
Wednesday, February 18, 2009
One inspection away from finished.
I love, love, love the sink cabinet! The turned legs give it just the look that I had in mind. One little curtain and the country kitchen will be complete. Finding just the right little curtain, well...that might take some looking.
Except for the absence of a fridge, we have a kitchen once again.
I ran the dishwasher through a complete cycle, just to test it out. Afterward, I remembered that it still had the protective plastic film on the door, so I peeled that off and watched it shine!
In the bathroom, I turned on the tub faucet for the first time, let the shower run, and plugged and unplugged the drain with the little rubber drain plug on a chain. Fun, fun! I couldn't help but think of my nieces and how I'm sure they will want to try out the tub next time they visit. What could be better than a bubble bath in a big ol' tub, with bubbles up to your chin?!
The electrical inspection should take place in the next day or two, and then....back to The Cottage!
Monday, February 16, 2009
The little details.
Carlos (whom I have decided is the real "magician" on this jobsite) came back today and replaced the chipped v-cap molding, so all's well again, and the sink is now perfect.
I taped a warning note to the sink, since I thought the plumber might arrive and install the dishwasher today. Silly, silly me.
The little piece of wood trim along the edge of the counter below is something that J constructed, a little feat of genius! The refrigerator's home is right alongside this counter, and I had originally opted to skip the v-cap (at $12 per 8-inch section) along this edge, to save money, since the fridge would hide it, anyway. J thought that something a little nicer might look good here, and this is what he came up with. I completely agree! He did an excellent job, and it finishes off the counter's edge nicely.
In between coats of paint, I made a few phone calls today, trying to find a replacement bathroom door. The old bathroom door was a plain-Jane modern hollow-core door with a wood veneer skin, all function and no form. Hence, once the door was removed from its hinges, out into the trash pile it went. I don't regret tossing it, but we are still sans bathroom door. I'm still looking, and hoping to find something that resembles the old original doors that are still in the house:
They are not pretty, but they are original (I think), and appear to be made of pine. This door illustrates what I don't like about natural wood doors: they darken significantly with age. This is one of 3 doors that all open into a tiny hallway and, man, is the hallway DARK! I really don't want to have to go with a white plastic-coated hollow door, but I'm not having much luck finding something like the one pictured below. Our local architectural salvage place has one old wooden door that's a 2-panel, and the right size, but it's a right-hand swing, and we need a left-hand swing door. And, no, I don't want to just switch the hinges around. They are mortised into the door, and the notches would be visible, and it would be completely obvious.
I also went to the sawmill and picked up some 8" baseboard molding, and started sanding it smooth today. I'll finish that another day.
Sunday, February 15, 2009
Patching and painting continues.
Houdini did a less-than-stellar patch job the other day, so I bought a small tub of premix drywall compound and had at it myself. It was just really bugging me that one electrical outlet still had a gaping hole extending well past the edge of its outlet cover. Aye, carumba.
Well... not anymore. I also smoothed over a few places where Houdini's mesh tape was still clearly visible through his prior plaster-digitation. Presto, change-o! It now looks like FINISHED DRYWALL!!!
I then tackled priming and painting Houdini's "touch-up" around the electrical box for the new under-valance light fixture above the kitchen window. The fixture was taken down last week so that the area could be patched up, but the light will be re-installed tomorrow. Once the top of the cabinet is installed over the valance light fixture, this tiny cramped space won't be easily accessible again, since I don't do electrical. Especially after witnessing our electrician getting zapped just the other day when he grabbed a live wire while installing the new GFCI outlets in the kitchen. He let out an impressive yelp and literally jumped off the floor. No, thank you. My rule has always been that all electrical anything must be installed by a qualified somebody, and that somebody ain't me.
Andrew began the day clear-coating the two halves of the split kitchen island leg for the sink cabinet trim. Yes, we received the new legs from the millwork company on Friday, and the two new pieces match very nicely. (Many thanks to the nice folks at Adams Wood Products in Tennessee for the quick turnaround)!
After the second coat dried, we stood the legs in place against the cabinet. The sink will be skirted with oak boards to hide the wooden stand that supports it. The split legs will be cut to length and installed along both sides of the sink, something like this:
After finishing the legs, Andrew started working on the bathroom trim, which we decided to leave natural, rather than paint. I love the appearance of cypress so much, and, frankly, this wood was expensive. It seems a shame to paint over it. So, we went ahead and clear-coated all of the cypress trim in both rooms. Andrew sanded and vacuumed away, and then gave every lick of bare cypress in the bathroom 3 coats of satin poly.
Meanwhile, I did likewise in the kitchen, working on the trim around the two doors and the window.
We quickly realized that there are at least a couple hundred, if not a gazillion, nail holes among all of these pieces of wood. They are tiny, from minuscule finishing nails, but they are numerous. Neatly camouflaging nail holes in unpainted wood is challenging, but I tried a new type of wax crayon wood filler.
It comes 4 crayons to a pack, with 4 different wood shades. You shave off a little piece of each, soften the wax in your hand and blend together, until you get a nice color match for your wood. You must apply at least one coat of finish to the wood prior to applying the wax, so the wax won't be absorbed into the wood. After plugging, you buff off the excess wax with a cloth. It does a superb job. I like it! Only about 700 nail holes to go....
Just before calling it a day, we peeled off the protective plastic film from the new window, so we can now see through it.
Tomorrow, Andrew must work, but I have the day off, and I'll be back at The Cottage to finish off the woodwork, finish priming and painting, and maybe the plumber will show up and hook up the dishwasher for us!
Thursday, February 12, 2009
Now we're cooking!
The replacement part for the defective faucet has been replaced, and the faucet installed:
J did a great job caulking around the sink this week, too. He used sanded caulk (I had never heard of it, but I'm sold on it) in the same color as the grout. Once the chipped v-cap is replaced and the caulk touched up, the sink will look great.
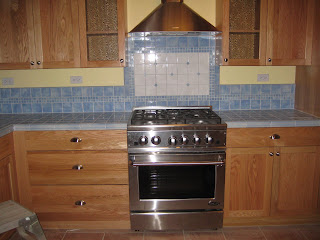
The gas range is also in place and fully functional:
We have ignition! Holy cow, I can't begin to tell ya!
Check out the cool purple light that indicates which burner is on!
The satin nickel vintage-style ceiling registers have been installed, too.
Here are the old white-painted aluminum registers, which are now destined for a good dusting, and then they will be off to our local Habitat for Humanity Thrift Store.
I ordered the new registers online from Atlanta Supply Company. They sell a wide variety of floor, ceiling, and wall registers. One of their customer service reps helped me choose these. They are heavy and made of solid brass. They were also very reasonably priced, and fit perfectly, too.
The dishwasher has been unpacked and put in place, though not actually installed yet.
Tuesday, February 10, 2009
Crazy legs, a pain in the drain, and anyone seen the plumber?
As mentioned in a previous post, the plumber came last week and installed the clawfoot tub, which is made of acrylic. On top of the tub's plastic wrapping was the tub installation instruction sheet. The very same instruction sheet that I later found tossed aside, apparently completely ignored, in the living room. The tub, meanwhile, had its drain installed by the plumber using plumber's putty rather than silicone to seal the threads. Too bad the plumber did not bother to read the manufacturer's instructions, a neon orange piece of paper with big black letters stating: DO NOT USE PLUMBER'S PUTTY TO INSTALL THE TUB DRAIN!!! USE ONLY SILICONE!!! (<-- only bolder, and in a much larger font).
When I stopped by The Cottage after work and found plumber's putty oozing from around the drain, I was seriously not happy. The tub, being plastic, is never supposed to come into contact with petroleum products or other solvents. Heavy naphthenic distillate, one of the ingredients in plumber's putty, sounds like a petroleum-based solvent to me.
The plumber was informed of the above, and promised to fix it ASAP. Six days later, the tub drain still has not been correctly installed. The plumber is nowhere to be found. He wasn't answering his phone or returning phone calls. One of his crew was supposed to come out on Saturday and finally take care of it, but never showed. Some excuse about meeting with his taxman. The plumber sucks, and I hate him. I also hope the IRS sticks it to him, big-time.
That was probably the most distressing of several blunders, goofs, oversights, and other assorted minor but annoying problems that the past week held in store for us.
The Plaster Guy (who we call "Houdini," because we were told "he's a magician" who would have a supposedly transformative effect, hiding all flaws and making uneven walls seem straight again) was expected to come back to rectify the semi-crappy drywall work he did a few weeks ago:
We were given word that Houdini was expected to rematerialize yesterday evening, but he somehow never showed up until today. In anticipation of Houdini's arrival, I carefully masked off the no-fly zones, remembering all the mud that got slung everywhere the first time he came out. The man does not own a rag, I don't think!
Houdini patched things up okay, for the most part, and only managed to slop drywall mud on a few off-target places in our new kitchen.
Another unexpected twist occurred yesterday when the v-cap molding around the sink got chipped by the contractor while he was trying to set the sink into its final position prior to caulking it in place. Poor J. He was very apologetic, and has ordered new v-cap. I know he is hating this sink right now, for this and many other reasons. I guess Carlos will be hating the sink some more, too, since he will now have to come back and replace the damaged v-cap.
Finally, the wood trim around the sink, the final design of which is still a work in progress, had a bit of a setback, too.
Pictured below are the 2 halves of a red oak kitchen island leg that will be used to trim out the area around the sink base. I ordered what was supposed to be a single leg, split in half lengthwise, from a millwork company in Tennessee. Sounds pretty straightforward, but this is what got delivered yesterday:
two mirror-image pieces of wood that are completely different colors! I emailed this photo to the company's customer service department, explaining why this was just not going to work. To their credit, they were very apologetic, and went out of their way to make things right. Two new (matching) half-legs were shipped out today, and the mismatched ones will be shipped back to them at no cost.
What a week!