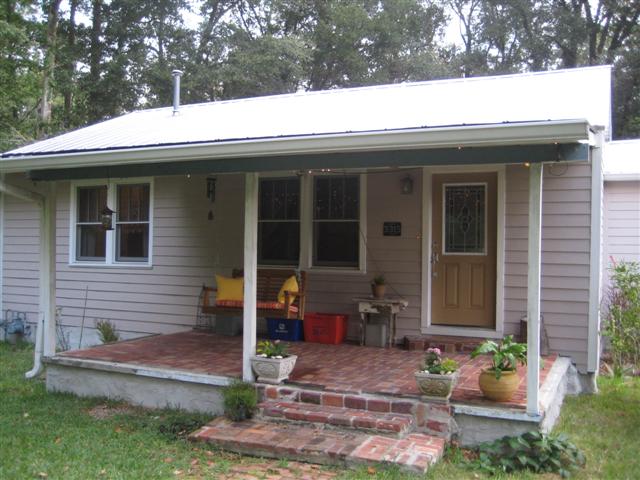
From the front:

And, here's a view of the back of the house.

We are still very much in the midst of emptying everything out of Andrew's house, an essential step before renting or putting the house on the market. Oh, the pain of combining 2 households into one, and all of the decisions about what to keep, what to get rid of, and where everything is going to go that goes along with it.
One thing that we have listed on Craigslist: the waterbed.

Need a queen-size water bed? Email me! You know you want it.
Meanwhile, over at the Cottage, we repainted the master bedroom, since we had ordered a complete set of new bedroom furniture that was scheduled to be delivered about 3 weeks later.
Naturally, we started by moving everything out of the bedroom.
Our bedroom, sans all furniture:

Notice the window (Window #2) behind Andrew, which has trim around it that at this point was still bare wood. I checked my photo files, and realize now that I had trimmed out Window #2 in 2006..

Yep, 3 years ago I had installed the trim, then never got around to painting it, or even priming it.
I know: bad, bad me.
So, we added priming and painting the trim around Window #2 to our to-do list.
The bedroom was a mauve color, the color I had previously painted in back in 2003. Pretty girly, I know. It was time for a change to a warm, soothing neutral color. We have now painted it "Blonde."
Beginning of the painting, cutting in the corners:

Andrew painting, and it was coming along nicely!

It's sort of the color of coffee with cream, or maybe melted coffee ice cream. Either way, yummy!
Me, caulking around the window trim. No, I never got around to doing that back in 2006, either...

After filling the nail holes and caulking all of the gaps, I did some touch-up to cover the caulk. Later, of course, I primed and painted the woodwork, too.

Okay, so were we done with the windows at this point? Oh, HECK NO! Not yet...
There was yet one more neglected window, Window #3, that needed attention. Window #3, like Window #2, was a replacement window that my neighbor and I installed back in 2003. Poor Window #3 only ever got its sashes primed, but never painted, and it never got any trim around it, at all. Sad, isn't it?
Window #3, "before" photo:

Now, painting window sashes is one of my all-time least favorite things to do. But, the time had come. So, the sashes and frame got 3 coats of lovely white glossy latex paint.
Meanwhile, Andrew and I got out the table saw that I had bought, used, from a friend, the miter saw, and the router (also bought, used, from the same friend). I had never before tried out either this particular table saw or router. We figured both out, and it all turned out great. The wood trim is poplar, which I like because it has very little grain and no knots. Easier to paint, and no knots means no dark resin stains seeping through your paint years later.
Window #3, with the trim finished and primed! I can hardly believe my eyes!! And, yes, that is a glass of wine on the windowsill.

Andrew paints the baseboards:

One more thing to do...and a little history of the Cottage:
Back in 2003, soon after closing on the Cottage, I removed all of the old drywall in this room, which I had decided would be the master bedroom, in order to have some new wiring installed and to insulate. None of the Cottage's hollow exterior walls had any insulation, back then.
With the walls gutted, I hired an electrician for an electrical upgrade, which mainly consisted of adding some extra outlets and bringing it all up to Code (at least in this room). After the wiring was done, I refinished the heart pine floors in the entire house, and the bedroom looked like this during the refinishing:

After I put in the fiberglass insulation, circa late Winter, 2003, before Windows #2 and #3 were replaced:

I am reminded, looking at these photos, of just how bad the old windows were. Click on the photos, and look at the scraps of wood holding the old windows open. Several of the old double-hung windows throughout the house had sashes that would not stay open. Each window came equipped with its own prop stick!
The next phase: replacing the drywall:

For the drywall job, I hired a handyman-guy recommended by a friend. I have finished drywall before, but I have never hung more than small pieces, and have never redone an entire room by myself. Handyman Guy had done some minor ceiling and wall patching for my friend, who liked his work okay. Turns out he was not a good drywall hanger. I am sure he regretted ever taking this job, especially after I went behind him and took down myself then made him re-install correctly a couple of entire sheets of drywall. There was anger, there was yelling, there were tools he left behind and never bothered to come back and retrieve. I didn't care whether I ever saw him again, and I really could not fathom how this guy could do such a crappy job and actually call himself a drywall installer. But, I digress.
The plan was, from the get-go, that Handyman Guy would install the SheetRock, and I would do all of the drywall finishing myself. You see, my brother-in-law, Matt, is a drywall contractor. My sister, Jen, is a very good drywall finisher. She taught me basic drywall finishing when we redid part of my old kitchen when I lived in North Carolina. However, thanks to Handyman Guy, I spent many extra hours above and beyond what is typical in order to very meticulously tape and mud in order to cover up his sloppy drywall job. Lesson learned.
Drywall Guy left behind this 1/2 inch gap alongside one of the electrical boxes, gap wide enough to reveal the stud next to the box. No outlet cover could conceal a gap this big. It looked pretty bad, and I don't recall why I never patched it back then, probably because it wasn't apparent until the time came to put the outlet cover back on. I don't remember. Luckily, I kept a dresser parked in front of it all these years. Out of sight, out of mind.

To repair the gap, I cut a small patch of SheetRock, and mudded over the paper edge of the patch that overlapped the rest of the wallboard. After letting the first coat of mud dry, I sanded it lightly and applied one more thin coat. After that dried, a little more sanding, then primer, and finally paint. Voila!

And here is the wall, all patched and painted. You can also see that the trim around Window #3 has been primed and painted. I have since given it about 3 more coats of paint, so it looks even nicer. The only thing left to do is scrape the excess paint from the glass panes around the muntins.

On to the furniture, old and new.....
What we had before:
The old bed was this one: a full-size Colonial style four-poster bed in a dark cherry finish. This is a pretty old photo from several years ago, because, heck, that's Window #2 next to it, and it didn't even have trim around it yet!

That bed had been in my possession for many years, ever since I paid $60 for it way back when at a Goodwill thrift shop. The old mattress set was equally ancient, I have no idea exactly how old, but old enough that I was not the first, and probably not even its second owner.
It also happened to be the most comfortable mattress I had ever slept on. Seriously.
Hard to part with it, but the time had come. Anyhow, bed and mattress set are gone now, donated to Habitat for Humanity's thrift shop. I thought I would hate to say it, but: good riddance!
Two dressers and a huge birdseye maple armoire have also been displaced in order to make room for our new bedroom furniture. Those will be posted on Craigslist soon, too.
We found this beautiful Oriental rug at Pottery Barn:

One of our 2 new dressers:

View from the doorway:

The flowery drapes will be replaced with some other window treatment, probably old-fashioned roller shades behind white lace curtains, in the near future.


